Showing posts with label Tutorial. Show all posts

Monday, February 10, 2014

Initials for the Nursery

Charlotte arrived last Friday, on the 31st. I took last week off and am now back and ready to blog! I had one thing left to do to her room, and that is to add her initials. Yesterday Michael's had a coupon for 30% off your purchase so I went and picked up three letters and three sheets of coral scrapbook paper.


I traced the letters onto the paper and then cut them out. I used Mod  Podge to attach the paper to the letters and then I covered the top with Mod Podge as well. 

Total project time: 30 minutes
Total cost: $10


Friday, April 5, 2013

A pillow case dress for grownups

Remember how I have about 100 yards of knit fabric sitting in my closet? Sure you do. Well, after making the pillow case dress for Lilly I decided to make one for myself...but with knit.

I started out the same way I would make a pillow case dress-folding the fabric in half lengthwise and then cutting out the arm holes. Next, I hemmed the top, leaving a large enough space for the "ribbon". Except where I would normally use ribbon I used a doubly thick strip of the same material. I fed it through the casing and then sewed the two ends together (no bows). I cut another strip and cut the edges with pinking shears (to spice it up a little) and used that as the belt.

Total Time: 30 minutes

I Love It.

Thoughts?!


Monday, March 11, 2013

High-Low Skirt

There's only three days left to enter this week's giveaway for a $25 Visa Gift Card, to enter-simply like my Facebook page by clicking here.

Now...onto something fun and creative. I've recently been loving the high-low look, both in skirts and in dresses. Here are some of my favorites from Pinterest.


I decided to make mine out of solid blue/purple knit material. First I wrapped the material around myself three times and cut, this was the width. The length was from my waste to my ankle. Next I sewed up the side so that I had a giant tube. Next, I folded the top down about 1 3/4 of an inch and sewed all the way around-leaving a two inch opening. Then I cut a piece of 1/2 inch elastic the length I desired and fed it through my 3/4 inch opening. Once I made it all the way around I sewed the two ends together and then sewed the opening closed. Now The waist of the skirt was gathered evenly around the top.

Finally, I cut the front of the skirt symmetrically to the height I wanted. I didn't hem the bottom because it was knit and I didn't feel like I needed to.

All in all, it was a pretty simple project and I love how it turned out. It is also very comfortable and you definitely can't pass up the comfort/cute combo. It's a win-win!

Thoughts?

High Low Dress

High Low Dress

Tuesday, February 5, 2013

Flannel Diaper Case

Hey guys! Don't forget to enter this week's giveaway for a charm pack of Marmalade fabric!


Today's tutorial is for a diaper case. Instead of having 5 diapers wandering around aimlessly somewhere in your diaper bag, why not make a case for them all to live in happily?

To make mine I used the Sugar Hill Flannel that I love from my sponsor Marie Madeline Studio. It is so so soft!

Materials:

  • 1/2 yard of fabric
  • 1/2 yard of batting
  • Ribbon
  • Sewing Machine
  • Thread
The first thing I did was cut out two identical rectangles from my flannel fabric. I determined the length and width in a very scientific manner...three diaper lengths and one diaper width and then I added 1 inch to the width and 1 inch to the length.

Once I had cut my two pieces of fabric I cut one piece of batting the exact same size.


Then I pinned the piece of batting to the back side of one of the pieces of fabric and sewed them together.  


Next I seed that piece to the other piece of flannel, front to front, leaving a small opening so that I could turn it inside out. 

I top stitched the opening and ironed the case so that it was smooth.

Next I placed a diaper in the case and tri-folded it so that I would know where to place my ribbon. I pinned the piece of ribbon to the back and sewed it down.

Diaper Pouch Tutorial

You only need to sew the ribbon to the area it touches the fabric in the above picture, only about a three inch section.

And you're done! Now you can fill your case with diapers and hit the road!

Diaper Pouch Tutorial

Diaper Case Tutorial

Diaper Case Tutorial


Wednesday, January 16, 2013

Fleece Hat with Ribbon

Here's a tutorial on how to make a fleece baby hat. It is a super easy project and a wonderful gift for baby showers.

Materials:

  • 1/4 yard of fleece 
  • Thread
  • Sewing Machine
  • Scissors
  • 3 feet of ribbon

Step 1: First I cut out four identical pieces from my fleece fabric. I guestimated the size based on other hats that Lilly had. You can see the pieces below, kind of  a pentagon shape.
Step 2: Next I sewed the sides of each piece together (front to front) so that I had a long strip as seen in the picture below. 


Step 3: Then I sewed the first piece to the last piece, creating a circle.

Step 4: Then I sewed the top (curvy) sections together as well, in the same way that I sewed the sides together and I ended up with a hat!
Step 5: Next I cut a long strip of fabric that was the same width as the hat and sewed the ends together so that I had a tube. I then pinned this tube to the bottom of the hat as seen in the picture below and sewed the two together.


Step 6: I then folded over the rest of the strip and sewed the other end to the inside of the hat, this is seen in the picture below.
baby fleece hat tutorial

Step 7: Finally, I cut four slits in the hat and fed some coordinating ribbon through the holes (weaving it in and out) and tied it in a bow. The ribbon is both decorative and you can cinch it to fit your baby's head perfectly :) Since fleece doesn't fray you don't need to worry about finished off the slits that you cut.

Below is the finished product!

This is the back of the hat

baby hat tutorial

diy baby project
 Blinking when the flash goes off :(

diy baby sewing project

Monday, January 7, 2013

Pleated Pillow

Happy Monday! I hope everyone had a great weekend! We bought a car a few weeks ago that we found online. It was at a dealer in NJ and for the past week we've been calling twice a day trying to see if it has been shipped yet. They kept saying "tomorrow probably" and so Friday I was fed up and decided to just go pick the thing up myself. I woke up at 3:00 AM on Saturday, drove to Norfolk, flew to Philadelphia, flew to Newark, took a taxi to the car dealer and arrived by 11:30 AM. Although they knew exactly when I would be there, they still didn't have the car ready until 2:00 PM!! I then turned around and drove home to VA, and got in around 9:00. I was exhausted but glad to have my new car. All in all, it's been a whirlwind of a weekend.

I DID find time a few days ago to make this adorable pillow.  This fabric is from my sponsor Skye Reve Fabrics and it is by Amy Butler.

Once I decided on how long I wanted my pillow to be, I cut out a piece of fabric that was about 8 inches longer than that.


Then, in the center I made one pleat. I ironed the pleat down and then pinned it into place. 


Then, I sewed it into place. My husband bought me a new sewing machine for Christmas and it has all kinds of decorative stitches. I used one of them here when sewing the pleats...it was a nice touch. I repeated this step until I had the number of pleats that I wanted. When I was happy with the way it looked, I cut out a second piece of material that was the same size as the first piece had become.


Then I sewed the two pieces of material together, front to front, and left a small opening on the fourth side. I flipped it inside out, filled it with polyfil and hand stitched the opening closed. I love how the pleats turned out and now just need to make a few more. It really was an easy project and didn't take very long at all.

DIY pillow tutorial

DIY pillow tutorial

Friday, January 4, 2013

Baby Tag Blanket Tutorial

Yesterday I whipped up a tag blanket and it took me less than an hour to complete. This is such a wonderful project for beginners and any expectant mom would absolutely love one of these as gifts. Lilly had one when she was little and loved it. Not only does it keep them warm but it's a toy at the same time!

I have put together an E-Book with step by step instructions, as well as step by step pictures so that you can easily make your own tag blanket. The E-Book is for sale in my store for $.75 but there is a way for you to get one for free as well...

If you are already a follower on my blog, simply share a link to this blog post on your Facebook page in a status. Comment below once you have done that and I'll email you a copy of the E-Book for free.

For those who are not yet followers, become a follower, leave a comment below once you have done so and I'll email you a copy of the E-Book for free!

This deal will continue through Friday, January 11th when I will pick a winner from all of you who have either shared on Facebook or become followers and you will receive the Tag Blanket that I made, (made from adorable and wonderfully soft flannel) pictured below. US residents only please.

Good luck


Tag Blanket

Tag Blanket Tutorial


Thursday, January 3, 2013

Newborn Quilt from old sweaters

Don't forget to enter to win this week's giveaway...3 yards of fabric! Click here for more info

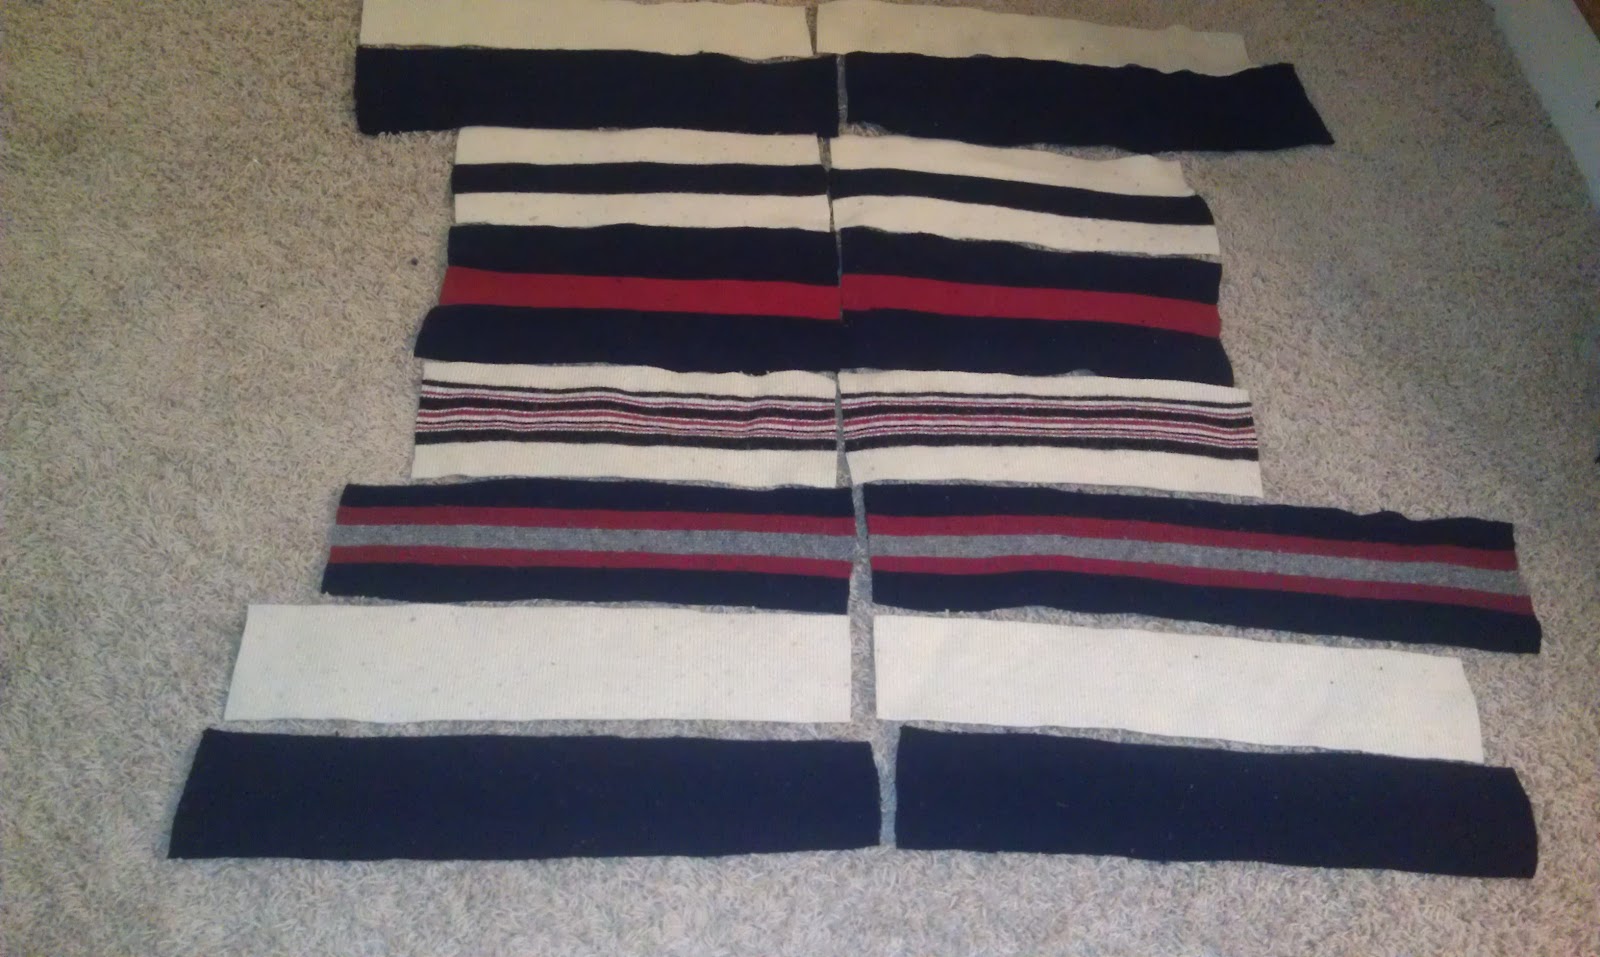
We cleaned out our attic this week and came across a few old wool sweaters that my husband no longer wears.


These four sweaters were all made of of wool and a bit outdated. I ended up using the first, second and fourth ones.

The first thing I did was cut out the strips that I wanted. I used as much of the sweaters as I could, making sure to get a variety of colors (using the sleeves and striped areas, as well as the solid areas)

Once I had cut out all the strips I wanted I had this:

Quilt from old wool sweaters

Next, I arranged them how I wanted them to look and began sewing the strips to one another (front side to front side)

Once all the strips were sewn together I cut the access edges, making the quilt a perfect square. Then I attached a layer of flannel for the inside and used another piece of white flannel for the back. I sewed the flannel and the wool together front to front and then flipped it inside out. I then hand stitched the hole that I left open and the quilt was finished!

Quilt from old wool sweaters

Here is the finished product

Wool Quilt from Old Sweaters

This picture shows you what the back of the quilt looks like

Wool quilt from old sweaters

It's the perfect size for a newborn and has some character because the material holds some meaning. A great way to use up some of your old sweaters don't you think!?


Monday, December 31, 2012

Fabric Giveaway!

Happy Monday!

There's no better way to start off a Monday than with a giveaway right? Well I am doing just that. Some of you may remember that a few weeks ago I was at an estate auction and came across a TON of fabric. Today's giveaway is for three beautiful yards of rose/red knit fabric that I got at that estate auction. It is medium weight and would make a great dress (or whatever else you'd like to use it for...I just happen to be a sucker for dresses...) 

It is untouched, in original condition and exactly three yards:


Use the Rafflecopter entry form below. Simply like our page on Facebook and you have an entry! Also, if you share the contest on Facebook you will receive an additional entry...so share away!

The contest will run through Friday (1/7/13) and is for US residents only.


Now...if you're wondering what amazing things you could do with  this knit fabric when you win, here are some ideas :)

Ruffle Knit Skirt

Ruffled Maxi Skirt

Wrap Knit Shirt Project

Long Sleeve wrap shirt

Knit Bathrobe Medium Weight
Bathrobe (I actually have one of these and I love it)

Jersey Knit Pillows

Need to dress up your bedroom or couch? How about some soft knit pillows?


However you choose to use it...keep me posted and post pics!


Monday, December 24, 2012

Sweater Dress Tutorial

Merry Christmas Eve! I'm getting so excited! Christmas Eve is one of my favorite days of the year and I hope you all have a great one.

Remember a few weeks ago when I bought 125 yards of knit fabric at an estate auction? Well, I've finally had enough time to do something with some of it.

I love sweater dresses and I've always wanted a white one. Some of the knit fabric I purchased was thick white, perfect for a warm, comfy, sweater dress.

I simply traced an old sweater dress I have and love and used it as a starting point for the new one. I wanted the new one to be long so I just continued down a little more. Once I finish my tracing I simply sewed the two pieces together (Front to front), hemmed the bottom and the neck areas and added sleeves. I like how it turned out and am excited to wear it. Oh...and for $.34 (two yards of fabric at $.17 a yard) it really was a great deal !!

Sweater Dress Tutorial

DIY Sweater Dress Easy Tutorial

DIY Sweater Dress Easy Tutorial

DIY Easy Sweater Dress Tutorial


Wednesday, December 5, 2012

Adorable Owl Hat...and some ugly sweaters...


Isn't that hat adorable? My friend Hannah makes them and you can find them in my store, or email her directly at hookyhannah@gmail.com

The hat fits Lilly perfectly and covers her little ears which is a plus as well.

Click here to see a gallery of all the wonderful things Hannah has made

Here's a close up of the hats...A.Dorable.

Knit Owl Hat

Last night my book-club had an "ugly sweater" Christmas Party. I went to the thrift store and picked up a plane red fleece for $1.98. Then I cut out a felt green Christmas tree and hot glued it onto the sweater,  along with some pink fekt decorations and a big polka dotted bow.


DIY Christmas Sweater

I had all the supplies so it was a quick, low cost, fun project. Below are some pictures of our party..and everyone decked out in their tacky sweaters...

DIY Ugly Christmas Sweater

Ugly Christmas Sweater