Showing posts with label Scrapbook Paper Projects. Show all posts

Friday, August 31, 2012

Before and After: Stairway Decor

Today is the LAST DAY to enter into the giveaway for your choice of three patterns from Seamingly Smitten!! Don't pass it up, these patterns are adorable!

Image of Ruffles Galore Pinafore


_________________________________________________________________________________

So on Tuesday I showed you how to make this DIY wall art using scrapbook paper, MOD podge and 8x10 canvases. My goal was to make a total of 10 so that I could replace the wall art I had going up my stairway.

DIY Wall Art

Below are some pictures of what my stairway looked like before (as in yesterday). I once thought these were cute, but that time has passed and I REALLY wanted to replace them with something new.


Here are some pictures of my living room, there is an orange/brown theme with some hints of red and green. My goal for the new artwork was to continue these colors up the stairs...


So here is the updated stairway! I love love love the way it turned out and the entire project was under $20! What do you think? Does it blend well with the living room?


Before and After Staircase Decor

DIY Wall art

Wednesday, August 29, 2012

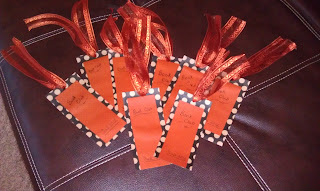
Bookmarks for Book Club!


DIY book mark

The book club I'm in meets every Tuesday evening. There are currently about 8 members and we cycle through so that each member has the opportunity to lead a book of their choice (once everyone has had a chance, we start the cycle over again) I am currently leading: Bonhoeffer: Pastor, Martyr, Prophet, Spy. We've just started the book but I think it's going to be a good one. If you'd like to purchase it, click on the link below.


It's a pretty lengthy book and will end up taking most of the fall. Because of this, I thought it would be nice to make bookmarks for all the ladies that were "fall-inspired". I purchased two sheets of card-stock and cut out my desired lengths. Then I punched a hole in the top and ran some corresponding ribbon through the hole. I glued the orange card-stock on using a glue-stick. After writing on each bookmark I painted over each one using Mod Podge, this made is extra sturdy.

I was planning on giving the bookmarks to the girls last night but we cancelled at the last minute due to a torrential downpour in our area...I guess they'll have to wait until next Tuesday!


DIY bookmark


Also, here are a few photos of our area...and why we couldn't have book club! This is the second time we've had flooding like this in the last three days...

HAMPTON - A Report It viewer sent this photo of flooding at Adwood Court between Whealton and Orcutt Streets in Hampton.

HAMPTON - Many cars like this one were stuck in flood waters Tuesday evening.

Tuesday, August 28, 2012

DIY Wall Art

DIY Wall Art
First of all, don't forget to enter this week's giveaway (three patterns of your choice from Seamingly Smitten!) Click here for more info.

I've been itching to put up new wall decor on the wall going up my stairs. I am so so tired of what I have there right now but I just wasn't sure what to replace it with. While in WalMart this week I came across a package of ten, 8x10 canvases, for $17!
Wall Art with scrapbook paper
I also noticed that Michael's has them for $19.99 (so if you have a coupon you could get them for as little as $1 per cavas!)

The other materials you'll need:
  • Mod Podge
  • Paint Brushes
  • Scrapbook Paper
  • Paint
I painted my canvas chocolate brown (I had leftover chocolate brown wall paint from a past room-painting project)

DIY wall art


Next, I cut out a circle and then a number of leaves from the scrapbook paper. I purchased six different designs that all coordinated with one another. For the leaves I just sketched what I thought looked like a leaf and then when I got it to look the way I wanted it to, I copied it about 20 times. 

Once the paint dried I attached my circle and leaves using a glue-stick. For the leaves that went to the edge of the canvas I cut them off where the canvas stopped. Below is a picture of the flower after glueing each piece down with the glue stick.

Wall decor with scrap book paper

The last step is to paint over/seal the design with modge podge. Below is a link to the mod podge I purchased from Amazon. I ran my brush in all directions to make sure that each piece of paper had a firm seal on it.


Here is a picture of what your canvas will look like before the Mod Podge dries
Wall Decor Using Scrap Book paper
And here is the finished product! I'm happy with the way it turned out...now I just need to do the other nine and hang them up!

DIY Wall art using scrapbook paper


DIY Wall Decor with Mod Podge