Showing posts with label Home Decorating. Show all posts

Monday, November 23, 2015

Dining Room Table Christmas Centerpiece


A few days ago I posted some dining room centerpiece inspiration for Christmas. I decided to tackle that room first and wanted to share what I ended up doing. I already had these birch candles and wanted to use as much of what I had on hand as possible. I found the wooden sectioned container at Ross for $11. I also already had the berries on hand. So for me, the total cost was only $11 and I will be able to use what I bought for other things throughout the year.

My favorite part is the paper runner though. I had been looking for paper runners on Etsy and they are expensive (also you have to buy then in like 30 feet incriments)! I didn't want to do that. My next idea was to buy normal brown kraft paper and stencil is with polka dots or stripes...but that sounded like a lot of work.

And then I found this WRAPPING PAPER at TJ Maxx. It was $2.99!  and was the perfect width so I didn't need to trim or cut it. I also still have some left to wrap presents!!

It is thicker than normal paper so it is pretty difficult to rip. I was so excited because it was exactly what I was looking for to give my table a contemporary feel...and it was under $3!

TJ Maxx had some great wrapping paper options that were really unique and elegant so check them out.

I love the finished result of my dining room table. Simple, inexpensive and a little modern.


Thursday, November 5, 2015

Christmas Decor Ideas for your Dining Room

I know. I know.

It's only just November.

But...I do love Christmas and before you know it Thanksgiving will be here...which means it's getting very close to time to decorate. I am going to try very hard this year to decorate well. I don't necessarily want to go overboard but I would like to do each room well and with style. I love the idea of a good dining room centerpiece so I thought I would start there.

Here are a few that I've found that have given me some (p)inspiration for my own dining room.

I love this one for a few reasons.

1. It looks simple enough to duplicate
2. I have birch candles like this already
3. Love this table!

This one is also simple, rustic, but beautiful. I love the garland going down the center. 


This one is a bit more traditional and I love the fresh greenery.


Finally, I like this one for either an outdoor dining area or an indoor one. It would be easy to duplicate simply by cutting up a log. 


Stay tuned to see what I end up doing in my own dining room this year!

Monday, January 13, 2014

Coral and Gray Nursery

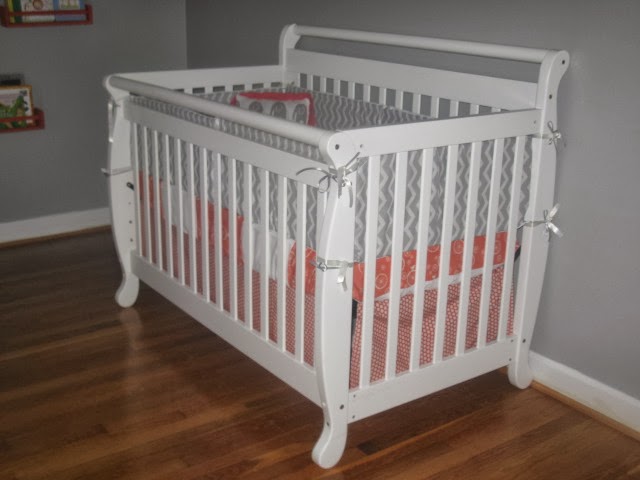
It's done! I love coral and gray together and wanted to do it for the nursery. It's also not super girly which I like, and can actually probably be used for either a boy or girl.

The main problem I had was there are a TON of shades of coral. I purchased the two coral fabrics in the sheet and bed skirt from fabric worm. They are organic cotton from Birch Tree and since they were in the same line they go well together.

The gray fabric in the bumpers is from Joanne's as well as the gray changing table cover.

For the artwork over the crib I simply recovered some canvases I already had with left over fabric. I used heat and bond to stick the elephent, flower and giraffe to the fabric and then hot glued the fabric to the back side of the canvases. I found the templates online and printed them off.

I purchased the white curtains from IKEA, the pair was only $10! I couldn't have made them for that, such a deal!

I had some coral/orange paint left over from another project and stenciled circles onto the curtains to give them a little color.

I painted the book shelves (spice racks) with the same orange paint before hanging them on the wall.


The book shelves (spice racks) were from IKEA. But if you, like me, don't have an IKEA near you you can find them on Amazon here


Wednesday, January 8, 2014

Nursery Sneak Peak

I'm almost done with the nursery! Hopefully all will be complete by the end of the week. I thought I'd give you guys a sneak peak of what's been going on.

The colors I've chosen are grey and coral. I've also realized that "coral" comes in a wide range and it's pretty hard to actually determine what is coral and what isn't. Because of this, some hints of orange have meandered into the room claiming to be coral...I'm ok with this.

These "book shelves" are actually spice racks from Ikea. They come as unfinished wood, so I painted them coral/orange. (Cornge) They were only $3.99 each which was amazing! Go Ikea!!


You can see the coral and gray continued a bit in the bedding but I still need to finish that, so pictures will come soon.


Sunday, November 3, 2013

Mountain House Update

We just returned from another weekend at the mountain house. This time we got smart and brought some enforcement...my parents! Together we accomplished so much!!!

Here is what the living room looked like when we moved in. The wall color was pretty dark and everything was filthy.


We painted the walls a light green, tore out the carpet, pulled up all the staples from below the carpet padding, and fixed some rotten wood by the double door going out to the deck. I like how the green looks with the stone around the fireplace.


Next, the kitchen. Below are the before pictures. The original kitchen had old and dated cabinet hardware, an ugly green counter top, a disgusting dishwasher and fridge and no oven or microwave. Also it was beyond filthy.


We updated it by adding new hardware, new appliances, refinishing the counter tops and doing some major cleaning. The total transformation came to $2050. Including all the appliances. (The biggest money saver was the stainless steel Kitchen Aid Fridge which we found at Habitat for Humanity Restore for $425. The other appliances were all on sale at Lowes...plus that military discount comes in pretty handy when purchasing large appliances!


We were also able to finish the bathroom this trip (Well, the mirror still needs to be hung but other than that, it's done) Originally the bathroom was nothing special and super dirty.


We added a nice vanity and mirror, light fixture, shower curtain, shower curtain rod, towel rods, new toilet and new shower head, trashcan, rugs and fan. The bones of the bathroom were good (floor and tub surround were great), it just needed some serious cleaning, a splash of color, and a few upgrades. Total cost: $825.00. While we know that the vanity didn't NEED to be replaced, we felt like it as worth the cost. There are a few things worth splurging on in order to make the room look more than just builder grade.


All in all it was a productive weekend and the house is really coming together. There are only a few rooms left to paint, and once the carpet is installed we can begin moving in furniture and decorating! Stay Tuned!!

Monday, October 7, 2013

Mountain House Update

We are home from our quick weekend trip to the mountain house. We were only there for about 36 hours but accomplished a lot. Each time we are there I can see the finished product coming together more and more...

One of the things I did this weekend was resurface the kitchen counter tops. We had originally planned on putting granite in the kitchen but were quoted $1739 from Lowes!!!

No thanks.

The kitchen is incredibly small and we were hoping to spend more like $800-$900. So, I spotted this counter-top restoration kit in Lowes ($250!) and had heard good things about it so we bought it. They had a few different color options to choose from but I felt like the brown/black combo would probably match the best.

I was really impressed with the finished product! The steps were easier than I imagined them to be and I was able to do it all by myself. I think if we had a larger kitchen, with larger sections of counter-top I might have needed help because you need to work quickly before it dries.

Basically, you apply the base coat and then put a ton of "decorative chips" on top of that, which give it the granite look. Once that's dry (overnight) you sand it down smooth and then apply the top clear coat. Besides the drying times there was probably about 2 hours of work.

We also purchased new appliances this weekend, which will be delivered the next time we are there. We installed the microwave ourselves though. I'm excited to get the white fridge and dishwasher out of there and the new stainless ones as well as the new range.

All in all, love the new look!

These are the before pictures. These were taken before we even closed on the house. Don't you just love he green/aqua counertops!


And here is the finished product


Thursday, September 12, 2013

The $45 Living Room Makeover

Here are some pictures of what my living room looked like a few days ago. The only difference is that we replaced the roman shades with plantation blinds a while ago. Other than that it looked like this. I once thought the mural was cool but now it looks a little 1970's. So, I wanted a change.


I chose a light green color to paint the walls. I also painted all the trim a bright white (it was an off white and looked dirty). Painting trim is one of m least favorite things to do. It's a sad truth about life, up there with the fact that Panera doesn't have a drive thru...and Chick-fil-a is closed on Sundays...

The other changes I made were moving the brown and red cabinet out and replacing it with the buffet that was in our dining room. It was kind of tight in the dining room and it looks much better out here. I really like the change.

The lamp on the buffet I purchased at an auction for $2. I loved the classic look of it, I bought the shade for $9.99 at Ross.

I also moved the three ceramic plaques from above the window to over the buffet. Then, since there wasn't any more orange in the room I changed the pillows and poppy seed picture out for green versions that we had in the guest room. (Our guest room is changing into a baby's room in the next few months so these items won't be missed)

So total costs:

Paint and paint brushes/roller: $33
Lamp: $12

Total cost:: $45!


I like how little clutter there is. It's definitely a more elegant and simple look but I like that. My nesting tendencies are taking over and I'm de-cluttering everything!